Hip Thrust Form and Technique
Why Proper Hip Thrust Form Matters
Hip thrusts are one of those exercises that can look “close enough” yet still feel wrong: all hamstrings, all low back, pinchy hips, or an awkward lockout you can’t own.
Most of the time, the fix isn’t a new variation or a different rep scheme, it’s dialing in setup, then repeating the same joint positions every rep so the movement stays a true hip extension (not a low-back extension).
This guide gives you a clear, repeatable hip thrust setup for barbells and hip thrust machines so your reps feel stable, powerful, and consistent..
What This Guide Covers
- How to set up a hip thrust so you can repeat the same rep every time
- The simplest foot placement target (and how to adjust from there)
- How to lock out hard without overextending your lower back
- The key cues that keep tension where you want it
- How to apply the same technique on a dedicated hip thrust machine (including Booty Builder-style belt machines)
The 3 Form Priorities That Make Hip Thrusts Feel “Right”
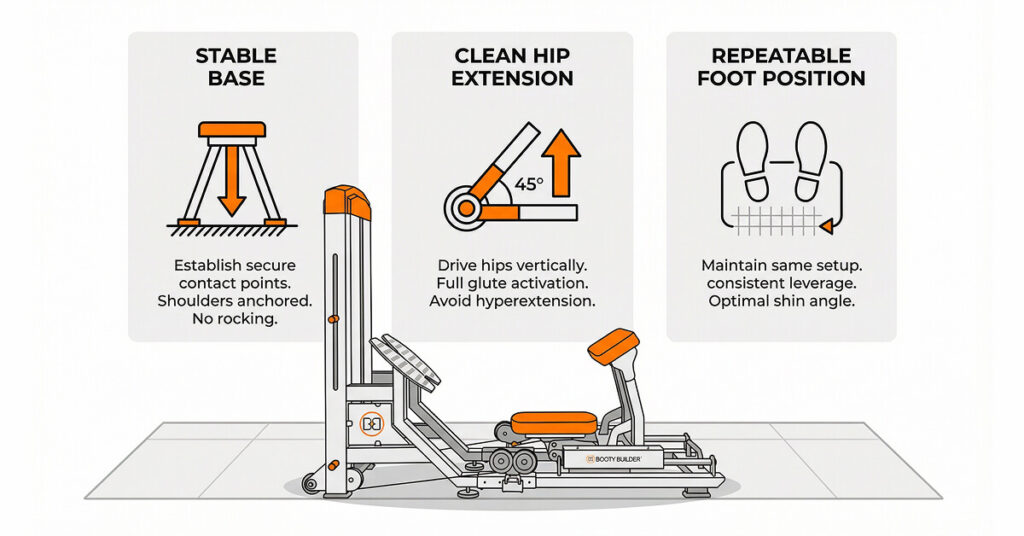
1) A stable base you can brace against
A hip thrust is easiest to control when your upper back contact is consistent and your feet don’t shift. If your bench slides, your shoulders slip, or your feet reposition mid-set, the rep becomes inconsistent (and usually less glute-focused).
Prioritize:
- A bench/box that doesn’t move
- A predictable upper-back contact point
- Flat, planted feet (no rocking)
2) Full hip extension without turning it into a backbend
A strong lockout is the goal—but it should come from driving the hips through and squeezing the glutes, not from “finishing” by arching your lumbar spine.
The feel you want at the top:
- Glutes doing the work
- Ribs stacked over pelvis
- No “crunch” in the low back
3) Foot placement that lets your hips do the work
If your feet are too far away or too close, you’ll usually feel the rep shift into a pattern you didn’t intend (often hamstrings or quads taking over).
The simplest starting target is:
- Shins roughly vertical at lockout
Then you adjust slightly based on what you feel (details below).
Research measuring hip thrust joint mechanics shows the movement places a high extension demand at the hip compared with other joints. A comprehensive biomechanical analysis of the barbell hip thrust (PLoS One)
Barbell Hip Thrust Setup Step-by-Step
Step 1 — Set your upper-back contact point on the bench
- Sit on the floor with the bench behind you.
- Position the bench so it contacts around the mid region of your shoulder blades (not your neck, not your lower back).
- When you thrust, your torso should be able to “hinge” over that contact point smoothly.
Quick check:
If the bench edge digs into your upper back or you feel unstable, use a slightly different bench/box or add padding.
Step 2 — Get the bar into the right position (comfort matters)
- Use large plates (or elevate the bar) so you can roll it into position without fighting it.
- Roll the bar to the crease of your hips (not your stomach, not mid-thigh).
- Put a bar pad, towel, or mat between the bar and your hips for comfort, especially as loads get heavier.
Why this matters: discomfort changes your mechanics fast. If you’re bracing against pain, you’ll rush reps and lose position.
Step 3 — Choose a stance width you can control
Start with:
- Feet about shoulder-width
- Toes slightly turned out if that feels natural
- Knees tracking in line with toes (no collapsing inward)
This isn’t about a “perfect” toe angle. It’s about finding a stance you can repeat while keeping knees stable.
Step 4 — Set foot distance using one simple target
A reliable starting point:
- At the top of the rep, aim for roughly vertical shins and a knee angle around 90°.
How to adjust from there (keep it simple):
- If you mostly feel hamstrings → move feet slightly closer
- If you feel too much quads or you can’t drive hips through → move feet slightly farther
- If your heels lift → bring feet a bit closer and focus on keeping the whole foot down
(Small changes matter—think 1–2 inches at a time.)
Step 5 — Brace before you lift
Before the first rep:
- Take a deep breath and brace your core
- Keep your spine neutral (not exaggerated arching)
- Keep head/neck aligned with your spine (avoid cranking your head back)
Perform the Rep: Lift, Lockout, Lower
The drive up
- Push the floor away and drive your hips up.
- Keep your feet flat and stable.
- Let your upper back rotate over the bench as the hips rise (don’t “scoot” your body).
Simple cue:
“Drive hips up” rather than “lift the bar.”
Own the lockout position
Your top position should look and feel like:
- Hips fully extended
- Torso and hips forming a strong “tabletop” position
- Glutes squeezed
- No extra range gained by arching your lower back
A practical standard many lifters use:
- Pause ~1 second at the top while staying stacked and controlled.
Control the descent
- Lower under control to a comfortable bottom position.
- Keep knees tracking over toes.
- Don’t “dive-bomb” the bottom or let the bar yank you out of position.
Depth guideline:
Lower until you reach a solid hip-flexed position you can control without losing bracing or shifting your feet.
Hip Thrust Machine Technique: Keep the Same Mechanics, Reduce the Setup Friction
Dedicated hip thrust machines are a very practical way to get more high-quality reps because they typically:
- Reduce time spent setting up a bench + bar
- Make it easier to repeat the same body position set to set
- Often improve comfort at the hips (depending on the belt/pad design)
- Often provides a better resistance curve and stretch.
- Are safer to use and provide better support.
Set the machine so lockout looks like a strong tabletop
Use the same targets you’d use with a barbell:
- At lockout: hips fully extended, ribs down, glutes tight
- Shins roughly vertical is a great starting point
- Feet flat and stable on the foot plate.
Adjustment rule:
If you can’t reach a clean lockout without your lower back taking over, adjust your seat/back/foot position until you can. Follow the instructions provided on the machines.
Belt/strap placement should feel secure, not crushing
On belt-style machines (common on Booty Builder-style designs):
- Place the belt across the hip crease so the force stays where you can drive it
- Tight enough to feel stable, not so tight you can’t breathe and brace
Make the machine work for your technique—not the other way around
- Brace first, then drive.
- Pause at lockout if it helps you stay honest.
- Control the lowering phase instead of letting the machine pull you down fast.
One-Minute Form Audit: Film These Two Angles
Side view checklist (most important)
Look for:
- Bench contact around mid-shoulder blade region (barbell version)
- At lockout: torso and hips in a strong line (no over-arching)
- Bar/belt staying positioned at the hip crease
- Feet staying planted (no shifting)
Front or 45° view checklist
Look for:
- Knees tracking over toes
- No knee collapse inward
- Even pressure through both feet
- Hips rising evenly (no twisting)
Safety Notes That Improve Technique Immediately
- If you don’t have access to a machine, use a bench/box that won’t slide; if needed, brace it against something sturdy.
- Use collars when appropriate and keep the area clear when loading/unloading.
- Stop a set if you feel sharp pain, numbness/tingling, or you can’t control the lockout without back compensation.
Continue Learning
Hip Thrust: Common Mistakes and Back Pain Fixes