Split Squat Proper Form and Technique
Split Squat Form Is About Controlling One Leg at a Time
A split squat is not just a squat with one foot behind you. It is a fixed-stance, single-leg-focused movement where the front leg does most of the work while the rear leg helps you balance.
That is what makes split squat technique different from regular squat technique. In a squat, both legs share the load more evenly. In a split squat, the main challenge is keeping the pelvis, knee, and foot organized while the front leg controls most of the descent and drive. Proper form is not about forcing one perfect stance. It is about choosing a stance length, depth, and torso angle that lets the front leg move smoothly without the back leg taking over.
What You’ll Learn in This Article
- How to set up your split squat stance without guessing
- Where your front foot, rear foot, knee, and torso should be
- How stance length changes the feel of the exercise
- How to descend and drive up without losing alignment
- How to keep the rear leg from doing too much work
- How to set up machine-supported split squats for more stable, repeatable reps
Start With the Right Split Squat Stance
Most split squat mistakes happen before the first rep starts.
The stance has to be long enough that you can descend without feeling cramped, but not so long that you lose balance or slide into an exaggerated lunge position. A useful starting point is a stance where the front foot stays fully planted, the rear foot gives light support, and the front knee can bend naturally without collapsing inward.
Front foot position
Place the front foot far enough forward that you can lower under control while keeping pressure through the whole foot.
Think:
- heel stays down
- midfoot stays loaded
- toes stay connected to the floor
- knee tracks in the same direction as the toes
Rear foot position
The rear foot is there for support, not to become the main driver.
For a standard split squat:
- keep the rear foot on the floor
- use the ball of the rear foot as a light support point
- avoid pushing hard off the back leg to “cheat” the rep
For a rear-foot elevated split squat:
- place the rear foot on a pad, bench, or machine support
- choose a height that feels stable
- avoid setting the rear foot so high that it pulls your hip or lower back into an awkward position
Stance length: the simplest rule
Start with a stance that lets your front knee bend comfortably while your front foot stays planted. Then adjust in small steps.
A 2023 split squat biomechanics study found that changing step length changes hip, knee, ankle mechanics and muscle activation. In that study, longer step lengths increased hip extensor demand and reduced knee/ankle range of motion, while the authors suggested that a step length around the individual’s leg length may be a suitable strength-training starting point for healthy adults.
Set Your Body Position Before You Lower
A good split squat should feel stable before you start moving.
Once your feet are set, organize your body from the ground up. Your goal is to keep the front leg in control while the torso and pelvis stay steady enough that the rep does not turn into a wobble, twist, or push-off from the rear leg.
Front knee
The front knee should bend naturally and track in line with the foot. It does not need to stay perfectly vertical, and it does not need to be forced behind the toes. What matters is that it moves smoothly and does not collapse inward.
Pelvis
Keep the pelvis square enough that both hip bones face forward. A small amount of natural movement is fine, but avoid twisting open or dropping one side as you lower.
Torso
Use the torso angle that matches your goal and feels controlled.
For most people:
- a slightly forward torso angle feels natural
- a fully upright torso may feel more quad-focused
- an aggressive forward lean can turn the movement into a balance challenge if you cannot control it
Save the deeper glute-vs-quad explanation for the muscles-worked page. On this page, the key is simpler: pick a torso angle you can repeat.
The Descent: Lower Straight Down, Not Forward and Back
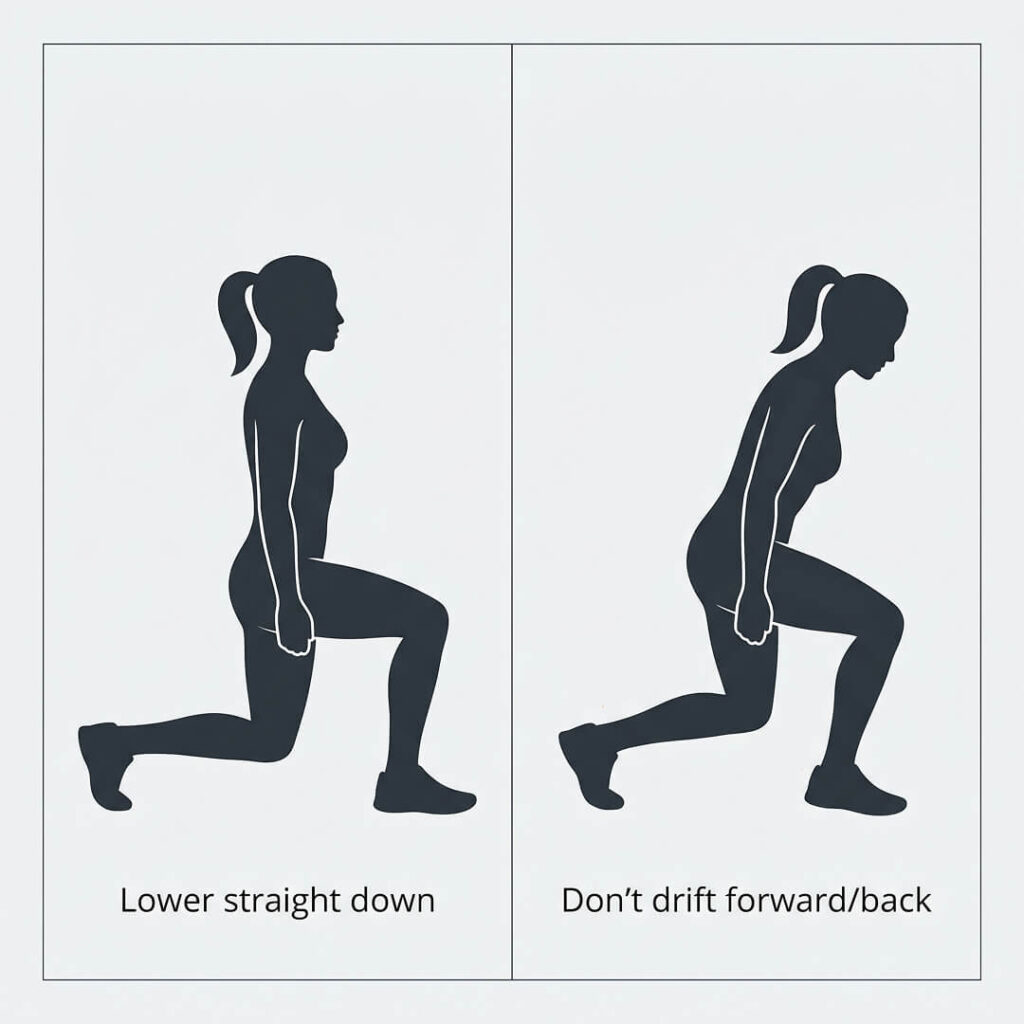
A split squat should feel like the body is lowering between the feet, not drifting all over the room.
Because both feet stay in place, your job is to control a mostly vertical up-and-down path while the front leg does the work. The front knee can move forward, the hips can drop, and the torso can incline slightly, but the movement should stay controlled and predictable.
Descent cues
Use these cues:
- “Lower between the feet.”
- “Keep the front foot heavy.”
- “Control the bottom, don’t drop into it.”
- “Let the front knee track with the toes.”
How deep to go
Use the deepest range you can control without:
- front heel lifting
- knee collapsing inward
- pelvis twisting
- rear leg cramping or pulling
- torso folding just to reach lower
Depth should be earned by control, not forced by momentum.
What the bottom position should feel like
At the bottom:
- front leg feels loaded
- rear leg feels supportive, not dominant
- front foot is still planted
- knee, hip, and torso positions feel stable enough to pause briefly
The Ascent: Drive Through the Front Leg
The split squat becomes much more effective when the front leg, not the rear leg, finishes the rep.
From the bottom, drive through the front foot and bring the body back to the starting position. Avoid bouncing off the rear leg or turning the movement into a back-leg push. If the rear leg is doing too much, the stance is probably too short, the load is too heavy, or you are rushing the bottom.
Ascent cues
Use these cues:
- “Push the platform away with the front foot.”
- “Front leg does the work.”
- “Stand tall without locking the knee aggressively.”
- “Keep the pelvis square as you rise.”
Lockout
At the top:
- front leg finishes strong
- hips return to a tall, stable position
- torso stays controlled
- you do not need to lean back or overextend to finish the rep
How to Keep the Back Leg From Taking Over
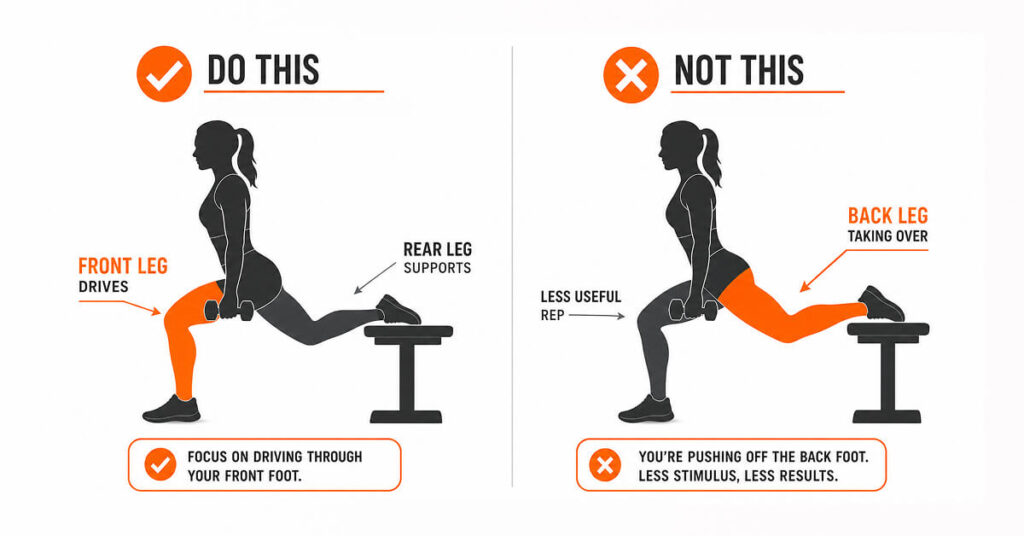
The rear leg is the most common hidden cheat in split squats.
If you push too hard from the back leg, the exercise becomes easier, but less useful for the front leg. This is especially common when the stance is too short, the rear foot is uncomfortable, or the lifter is trying to use too much load.
Signs the back leg is doing too much
- You feel the rear quad or hip flexor more than the front leg
- The front foot feels light during the drive up
- You bounce off the rear leg at the bottom
- Your body shifts backward as you stand
Fix it
- Move the front foot slightly farther forward
- Slow the bottom of the rep
- Keep pressure through the full front foot
- Think of the rear leg as a kickstand, not a second engine
Rear-Foot Elevated Split Squat Setup
Rear-foot elevation can make the split squat more demanding, but only if the setup is stable.
The rear-foot elevated split squat is often where people lose control because the rear foot position becomes the limiting factor. The goal is not to find the highest pad or bench. The goal is to find a rear-foot support that lets the front leg work hard while the pelvis and torso stay organized.
Rear-foot height
Choose a height that feels stable and does not pull the rear hip into an uncomfortable stretch.
A good support height lets you:
- lower smoothly
- keep the front foot planted
- avoid arching the lower back
- keep the rear leg relaxed enough that it does not dominate
Front-foot distance
Once the rear foot is elevated, adjust the front foot until the bottom position feels controlled.
If you feel cramped, move slightly forward.
If you feel over-stretched or unstable, move slightly back.
Hand support is not cheating
Light hand support can improve technique. If holding a rack, handles, or machine supports lets you keep the front leg loaded and the pelvis stable, that usually makes the exercise better, not worse.
Machine-Supported Split Squat Technique
Machine support does not make the split squat less serious. It makes the setup more repeatable.
In the Booty Builder lineup, the Selectorized Deadlift/Split Squat machine is built for rear-foot elevated split squats and hinge-based variations. The built-in split squat pad, large platform, multiple handle options, adjustable height settings, and selectorized loading make it easier to set the same stance, support the rear leg comfortably, and keep tension on the working leg across sets.
Machine setup checklist
Use this sequence:
- adjust the rear-foot pad to a comfortable height
- place the front foot on the platform
- hold the handles lightly for stability
- brace before lowering
- lower under control
- drive through the front leg to return to the top
Why the machine is especially useful
Machine-supported split squats can help because they reduce the problems that often limit free-weight split squats:
- unstable rear-foot support
- balance becoming the main limiter
- inconsistent stance length
- awkward dumbbell positioning
- wasted setup time between legs
Technique priority on the machine
Do not use the handles to pull yourself up. Use them to stay stable while the front leg does the work.
The goal is:
- stable front-foot pressure
- controlled depth
- square pelvis
- repeatable reps
- front leg as the clear driver
Quick Form Checklist
Before adding load, make sure the rep passes these basics.
From the side
Check that:
- front foot stays planted
- descent is controlled
- stance length does not change
- torso angle stays consistent
- rear leg is supportive, not dominant
From the front
Check that:
- front knee tracks with the toes
- pelvis stays reasonably square
- you are not shifting hard to one side
- the front leg controls the rep
Key Takeaways
- Split squat form is different from squat form because the front leg does most of the work while the rear leg supports balance.
- Stance length is one of the biggest setup variables; small changes can shift comfort, depth, and joint demand.
- Proper form means controlled depth, front-foot pressure, knee tracking, and a rear leg that does not take over.
- Rear-foot elevated split squats require a stable rear-foot support—not the highest possible pad.
- Machine-supported split squats are extremely useful because they make setup, rear-foot position, and rep quality easier to repeat.