Deadlift Form and Technique
The Goal of “Good Deadlift Form” Is Repeatable, Efficient Reps
Most deadlift issues don’t come from “weak backs.” They come from reps that change shape under load, bar drifting forward, hips shooting up, or the spine losing position.
A good deadlift rep is simple to describe: you start in a strong hinge position, brace hard, and move the load in a controlled line while your hips and knees extend together. The best technique cues are the ones that help you repeat that same rep, whether you’re pulling a barbell from the floor or using a deadlift machine with a stable platform and adjustable setup.
What You’ll Learn in This Article
- How to set your start position without guessing (feet, bar, hips, shoulders)
- How to brace so your torso stays rigid through the pull
- The “bar path rules” that make deadlifts feel stronger immediately
- How to lock out without leaning back or overextending
- How to lower the weight without losing your hinge
- How to deadlift on a machine (including Booty Builder-style deadlift machines) with the same core technique principles
- Simple self-checks to know if your reps are consistent
First Principle: The Deadlift Is a Hip Hinge With a Rigid Torso
If you treat a deadlift like a squat, the bar usually drifts forward and your back ends up doing more than it needs to.
In a deadlift, your torso angle is created mostly by hinging at the hips (hips travel back) while your trunk stays braced and stable. Your spine shouldn’t be “moving you through the rep.” Your hips and knees should.
Quick hinge check (30 seconds)
- Stand tall with your hands on your hip bones.
- Push your hips straight back until you feel hamstrings load, without rounding to reach deeper.
- You should feel tension build in glutes/hamstrings while your ribs stay “stacked” over your pelvis.
“Neutral spine” the practical way (what it really means)
- Aim for a stable spine position you can hold from start to finish.
- Your goal is not a perfectly flat-looking back; it’s avoiding a rep that changes shape as the load moves.
Barbell Deadlift Setup Checklist
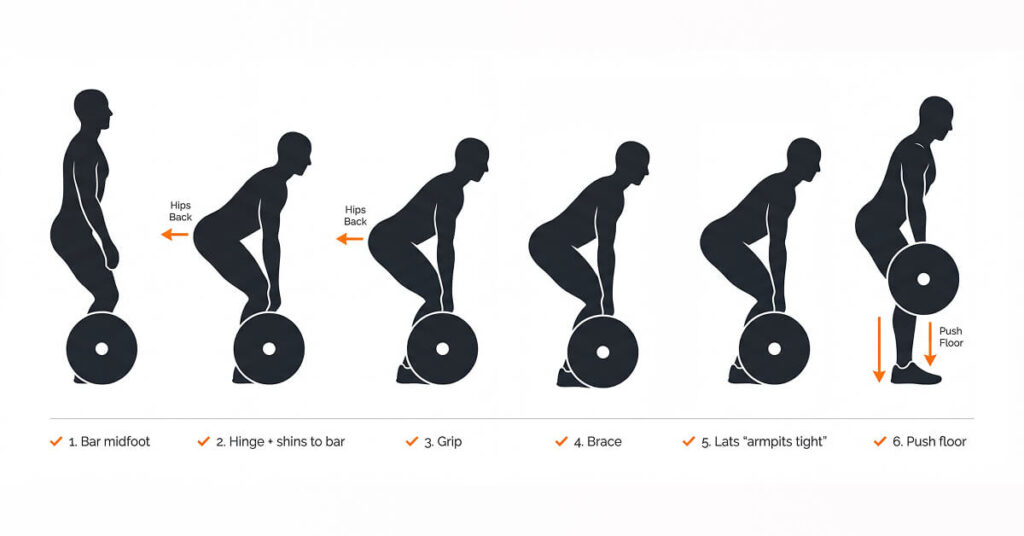
Most deadlift problems are solved before the bar leaves the floor.
Use the same setup sequence every time. Consistency here makes the pull feel smoother and usually stronger.
Step 1: Put the bar over the middle of your foot
- Stand with the bar positioned roughly over your midfoot (around the shoelaces).
- Your shins start close to the bar (small gap), but you don’t start with the bar pushed forward.
Step 2: Choose a stance you can “push the floor” from
- Start about hip-width to shoulder-width (conventional).
- Feet mostly forward or slightly turned out—choose what lets your knees track comfortably.
Step 3: Hinge down, then bend the knees until shins meet the bar
- Push hips back first to “find” the hinge.
- Then bend your knees until your shins touch the bar.
- This usually puts the shoulders in line with the bar or slightly ahead (common strong pulling position).
Step 4: Grip and arm position
- Grip the bar just outside your legs.
- Keep arms straight like straps, no early arm pull.
- If your grip is limiting: use chalk, straps (for hypertrophy work), or progress grip separately.
Step 5: Brace before you pull
- Inhale and brace your trunk (think “360° pressure” around your midsection).
- Keep ribs down enough that you feel locked-in—not flared and loose.
Step 6: Engage your lats to keep the bar close
- Think: “squeeze your armpits” or “bend the bar toward you.”
- This is one of the most reliable ways to stop the bar from drifting away from your legs.
NSCA coaching cues for deadlift efficiency (lat engagement, head/torso position, knees out)
The Pull: How to Break the Bar From the Floor Cleanly
The first inch matters. If the bar breaks the floor with a jerk, your position usually collapses.
A strong deadlift starts with tension, then a smooth drive.
Step 1: “Take the slack out”
- Before the bar rises, create tension so you feel loaded against the bar.
- You should feel your torso tighten and your legs “ready,” not yanking the bar with loose arms.
Step 2: Push the floor away
- Initiate by driving through the floor, letting hips and knees extend together.
- The bar should rise as your torso angle stays controlled (no instant “hips shoot up”).
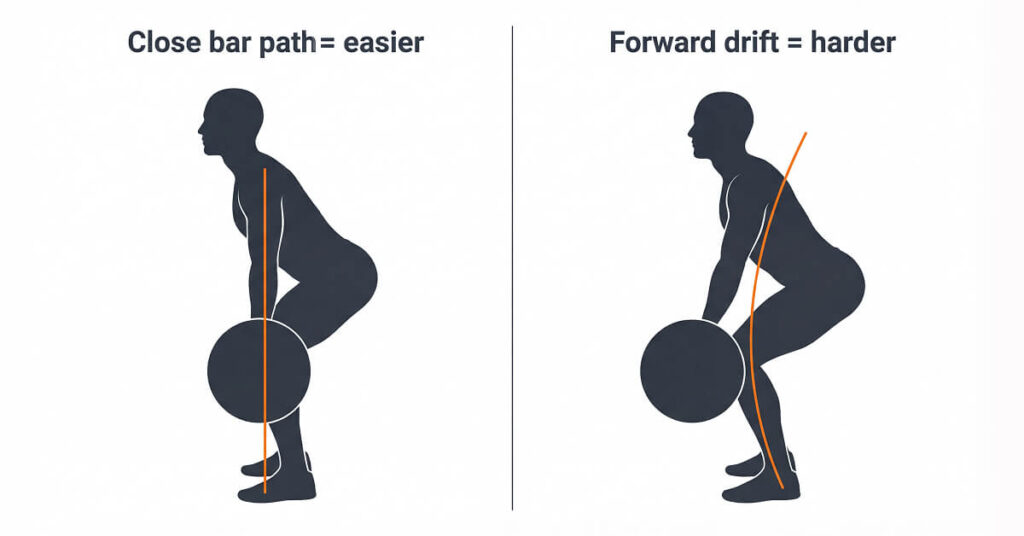
Step 3: Keep the bar close (your simplest bar path rule)
- The bar should travel close to your shins and thighs.
- If the bar drifts forward, the rep gets harder fast, and your lower back often becomes the limiter.
Lockout: Finish the Rep Without Leaning Back
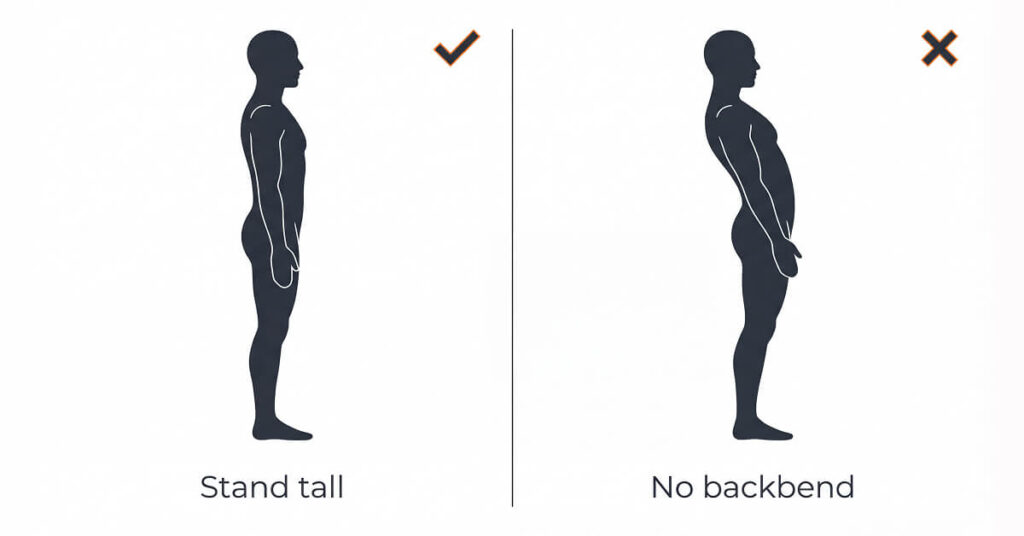
A deadlift lockout is standing tall, nothing more.
At the top, the rep is complete when hips and knees are fully extended and your torso is stacked.
Clean lockout cues
- “Stand tall.”
- “Glutes finish the rep.”
- Avoid turning lockout into a backbend (no aggressive lean-back or rib flare).
What the top should look like
- Knees straight (not hyperextended).
- Hips through.
- Ribs stacked over pelvis.
- Shoulders relaxed down/back without shrugging.
The Descent: Lower With Control and Keep Your Hinge
A sloppy eccentric is a fast way to lose position and turn the next rep into a grind.
Lowering should look like the reverse of lifting: hinge first, then bend knees when the bar passes them.
Simple lowering sequence
- Push hips back first (bar stays close to thighs).
- When the bar clears the knees, then bend knees to set it down.
- Reset your brace before the next rep, especially for heavier sets.
Deadlift Machine Technique (Stable Setup, Same Principles)
A good machine deadlift still requires a hinge, a brace, and clean lockout—machines just make the setup more repeatable.
Deadlift machines can be a major advantage when you want consistent positioning, fast transitions, and high-quality volume without the logistics of a barbell setup. On Booty Builder-style selectorized deadlift machines, adjustable handle heights and a large platform can make it easier to match your start position to your body and repeat it session to session.
Machine setup checklist (works for most deadlift machines)
- Adjust the handle height so you can start with a strong hinge position without rounding to reach.
- Set your feet on the platform so you can push through the whole foot (not toes).
- Brace before the first rep, don’t “find your brace” mid-pull.
The rep on a machine
- Start tight: brace + lats on.
- Drive up by extending hips and knees together.
- Finish tall (no lean-back).
- Lower with control: hinge first, keep torso rigid.
Why machines are often easier to do “perfect reps” on
- Less setup variability (same platform, same handles, same start depth each time)
- More repeatable alignment under fatigue
- Faster to get into position when your goal is output and progression
Self-Checks: How to Know Your Deadlift Form Is Solid
You don’t need perfection, you need consistency.
Use these simple checks. If you pass them, you’re usually in a strong place to progress.
Video checks (side view is best)
- The bar/handles move smoothly without a jerk off the floor/start
- Your hips and shoulders rise together early in the rep
- The load stays close (no big forward drift)
- Lockout is tall and stacked (no backbend)
“If this happens, do this” quick fixes
- Bar drifts forward → cue lats (“armpits tight”), start with bar over midfoot, keep it close
- Hips shoot up → reduce load, build tension first, push the floor away
- Back position changes rep-to-rep → simplify: lighter load, pause reps, or use a machine/start-height adjustment that allows a stable start
When to Regress (Smart) Instead of Forcing It
Good training is progress you can repeat, not one rep you survive.
Use a regression if you can’t maintain a stable position.
Good options:
- Lower the load and own your hinge and brace
- Use a reduced start height (blocks/rack pull) temporarily
- Use a deadlift machine with adjustable start depth/handles so you can start strong
- Choose a deadlift variation that matches your current mobility and control